The OrderPort Five application is compatible with the OpenEdge payment processor. The application is available exclusively on Apple iOS devices running iOS 15 or later. If you are utilizing Worldpay, please refer to the OrderPort WP Guide. If you are using OrderPort Payments powered by Stripe, please consult the OrderPort Six Guide. Please note: This application is no longer being maintained.
TABLE OF CONTENTS
Downloading the App
- Point of Sale Settings
- Signing in
- OrderPort Point of Sale Overview
- Manage Page
- Types of Transactions
- Running a Transaction
- Standard Payment Methods
- Other Payment Methods
- Selling Gift Cards
- Printing
- Reservations
- Creating a Customer Account
- Adding a Wine Club Member
- Shipping an Order
- Updating and Reviewing Customer Accounts
- Releasing Pickup Orders
- Refunding a Transaction
- Editing an Order
- Physical Inventory Count
- Clock In / Clock Out
- Drawer Open
- Drawer Close
- Reports
- Devices
- FAQ's
- How do I add or remove wine to an order that is already paid using OrderPort Five?
- Can I change the default number of guests on the Order pop-up?
- Can I make any edits to a previous day’s entries for Cash Drawer Open or Cash Drawer Close?
- What is the best way to run several orders for multiple people and use the same credit card for all orders so that it does not decline?
- Would you set up an event tasting room the same way you would set up a normal tasting room?
- How do you make a product or wine "Club Only" on the Point of Sale?
- Why does the POS order display a different email than the one attached to the account?
- Can the Quick Order Feature be Disabled?
- Can I use Visa Gift cards or other credit card brand gift cards at checkout?
- How do I delete a basket? Can I prevent my staff from doing this?
- What is an Orphaned Transaction?
- What should I do if I have an Order that is stuck on my Point of Sale?
Downloading the App
To download the app on your Apple device, navigate to the App Store. In the search bar, type OrderPort Five. The application icon will be dark blue in color.

The OrderPort Point of Sale applications on Apple devices require iOS (or iPadOS) version 15 or better. We have not yet tested iOS 26 or iPadOS 26. Please do not upgrade until you receive confirmation from OrderPort.
iOS 15 was released in 2021. For a list of iOS 15 compatible devices, please see this document from Apple: https://support.apple.com/en-us/103201.
Please note: This document has not been updated with the latest device releases. If you have a newer model than what is listed (eg. iPad 11th gen.), there won't be any issues regarding iOS versions.
Point of Sale Settings
Prior to logging in, you will need to set up the Point of Sale settings. These settings can be found in OrderPort Administration > Services > Point of Sale > Settings. They allow you to change certain functionality within the app. Watch this helpful video on OrderPort University.
There are Universal Settings at the top of the screen that affect all tasting room and restaurant locations. Below are the Individual Tasting Room Settings, which allow you to configure different settings for each business location.
If any changes are made to these settings, you will need to fully sign out of all devices using the OrderPort app and then sign back in. To do this, navigate to the Manage screen and select the red Sign Out button in the upper-right corner. Once you sign back in, the changes will be applied.
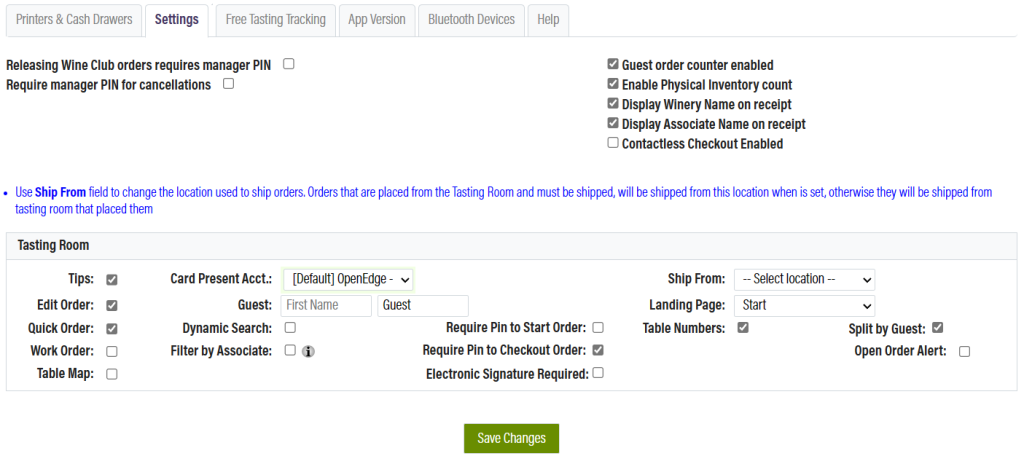
Universal Settings
The checkboxes at the top of the page affect the behavior of all tasting rooms and restaurant locations.
- PIN Settings: Located on the left side. These settings require certain actions to be approved using a manager PIN.
- Guest Order Counter: Guests without accounts are given a default name. This setting helps distinguish between multiple guests with the same name by adding a number.
- Physical Inventory Count: Allows inventory counts to be completed directly from the device. These counts are imported into OrderPort Admin, where a manager resolves any discrepancies.
- Receipt Options: Customize whether the winery name and associate name are displayed on the receipt.
- Prevent opening orders created in a different app: If your winery uses the Resurant application in addition to OrderPort 5, this setting should be enabled to prevent Resturant Orders from being opened on OrderPort 5.
Contactless Checkout
One of the Universal Settings is called Contactless Checkout. We strongly recommend all wineries have this setting enabled. Please note: This has nothing to do with the tap-to-pay features.
When enabled, the following workflow will be used: Checkout Page -> Tip Screen -> Payment -> Completion.
When disabled, the following workflow will be used: Checkout Page -> Payment Tip Screen -> Completion.
Please note: When disabled, the payment processor will be called twice, once for the initial payment, and a second time in order to add the tip charge. There are additional risks that come with this. To learn more about them, please see the Backend POS Payment Processing Details document.
If you update the setting, make sure to save the change. You will need to close and reopen your OrderPort Point of Sale app for the change to take effect.
For a video demonstration of the different workflows, please see this OrderPort University lesson: Contactless Checkout Setting – OrderPort University.
Tasting Room Settings
- Tips: Enables or disables tips.
- Edit Order: Enables or disables order edits at the point of sale.
- Quick Order: A legacy option that is no longer relevant.
- Work Order: Enables or disables work orders.
- Table Map (Required for Restaurant): Allows you to set up a seating area with tables and chairs on a virtual map. This map is a separate screen viewable from the Manage page. Tapping a table starts a new order at that table. This setting requires Table Numbers to be enabled.
- Card Present Account: The credit card processing account used by the point of sale.
- Guest Name: The default name given to customers without accounts.
- Dynamic Search: Updates search results as you type. If disabled, results will not display until the search button is pressed.
- Filter by Associate: When enabled, active carts displayed on the Manage screen are filtered by user.
- Receipt Printing (Restaurant Only): Can be set to automatically print merchant and/or customer receipts. This setting is ignored if Electronic Signature is enabled.
- PIN Options: Require a PIN to start and check out an order.
- Electronic Signature Required: Requires the customer to provide an electronic signature.
- Ship From Location: Selects the default shipping location for orders placed at this location. If left blank, the order will ship from the tasting room.
- Landing Page: The default screen displayed on the Manage page. This is only relevant if Table Maps are enabled.
- Table Numbers (Required for Restaurant and Reservations): Allows associates to assign table numbers to each order.
- Split by Guest (Required for Restaurant and Reservations): Allows customers to split orders into separate bills by guest. Requires Table Numbers to be enabled.
- Prevent Checkout with Unprinted Items: Kitchen and Bar designated items must be printed to their respective printers to check out the order.
- Suggested Tip Amounts on Customer Receipts (Restaurant Only): Tip amounts will print on the receipt to assist in Tip calculation.
Open Order Unlock:
The Open Order Unlock feature is highly recommended to be enabled. When this feature is turned on, it prevents another clerk from editing or processing payment on the same order from a different device. This helps prevent orders from becoming corrupted.
When an order is open on one iPad and you attempt to open it on another, you will receive a pop-up warning indicating that the order is locked.
In the Users module, you can enable an account to override this pop-up. It is recommended that only managers have this permission enabled.
Signing in
After downloading the OrderPort Five app on an Apple device and opening it, you will be prompted to enable the Local Network. This feature is required for printer pairing. After selecting Yes, you will use your OrderPort Administration login to access the app. You will be asked to enter a username, password, and PIN. If you need assistance obtaining these credentials, please contact helpdesk@orderport.net.
After logging in for the first time, the app will also prompt you to enable Bluetooth. This is required for pairing card readers and barcode scanner devices. You will then be asked if you would like to pair your card reader immediately. If you choose to do so, please review the Card Reader Pairing and Troubleshooting Guide.
After selecting No, or after successfully pairing the card reader, the app will prompt you to select any available printers or cash drawers you would like to connect. If you wish to set this up later, you can select the X in the upper-right corner of the yellow pop-up.
OrderPort Point of Sale Overview
Prior to creating any orders on the Point of Sale, please watch this OrderPort University Training. The OrderPort Point of Sale is organized into six different pages:
- Manage page
This is the page you will see when you first log into the app. From here, you will start new orders and view open orders. You also have access to a variety of buttons on the right. - Shop page
This page is used to add products to orders. Whenever you open an order in the Manage page, you will be brought to the Shop page. - Checkout page
This page is used to take payment for orders. - Account page
This page is used to manage customer accounts. - Club page
This page is used to register customers for your wine clubs. - Tools page
This page is used for administrative tasks. App settings can also be configured here.
Manage Page
The Manage screen is the home page of the OrderPort app. From here, you can manage orders, employees, and access all other features provided by the OrderPort Five app. This screen is divided into three main sections: Top Navigation, Side Navigation, and the Order Manager.
Top Navigation:
This purple bar allows you to switch between the different point-of-sale tabs, including Manage, Shop, Checkout, Account, Club, and Tools. Each of these sections will be covered in this document.
Side Navigation:
This gray bar provides access to specific tools, including Reservations, Table Map, Drawer, Order Search, Gift Card Balance, and Clock In/Out. It also includes a Clear All button for the Order Search feature. Each of these tools will be covered in this document.
Order Manager:
This section is divided into two parts: Start Order and Order Navigation.

To create an order, use the Start Order feature. If the order is for an existing customer, enter their name next to the Start button. Once you locate the customer, tap on their name. If the customer is not an existing member, simply select Start. You will then be prompted to select the number of guests and their seating location.
The Order Navigation section allows you to view the customer name, seating location, and order type. Since these orders have not yet been completed, they are referred to as carts. Each cart type has an associated color to help indicate the current status of the order.
If Filter by Associate is enabled in the Point of Sale settings, you will see tabs displaying the names of all currently signed-in employees. With this feature enabled, each employee will only see the orders assigned to them.
Types of Transactions

Standard Orders
Guest Orders:
To start a guest order, click the Start button on the Manage screen. When viewed from the Manage screen, this order will appear as a dark blue bubble labeled “Guest 1.” As you create additional guest orders throughout the day, the number will increase. This count resets at midnight each day.
Member Orders:
To start a member order, enter the customer’s first name, last name, email, or phone number and click Search. Tap on the customer’s account to start the order. When viewed from the Manage screen, this order will appear as a green bubble with the customer’s name.
Specialty Orders
To-Go Orders:
To-Go orders allow you to take a customer’s order upfront and send them a text message when the order is ready. You can also choose whether to collect payment before or after the items have been received. To use the To-Go Order feature, it is recommended that the Messaging Module is enabled. This option must also be enabled in the Point of Sale settings for the tasting room.
Steps
- Search for a customer to start an order, or start a guest order.
- On the Guest Count pop-up, select the gray To-Go button.
- Add items to the cart.
- If you want to take payment immediately, you must start a tab.
- On the Shop screen, select To-Go Ready to send the customer a text message. (This will only work if the Messaging Module is enabled.)
- Take payment or close the tab.
To enable the messaging module, please contact helpdesk@orderport.net.
Work Orders:
To use work orders, you need to ensure the setting is enabled in the point of sale module for this location. To learn more about work orders, review this OrderPort University Training. When viewed from the Manage screen, this order will appear as a purple bubble with the customer’s name.
When viewed from the Manage screen, this order will appear as a gray bubble with the customer’s name.
Payment Colors
In the OrderPort Point of Sale, a standard or specialty transaction will be overridden by a payment color to help staff quickly identify the current status of an order.
Reservations:
If you have the Reservations Module enabled and start a reservation with a prepaid item, the order bubble will display as light blue. When you check out this order, it will function like a tab, charging any additional amount to the card used to place the reservation.
Tabs:
After starting a standard or specialty order and navigating to the Checkout screen, you will have the option to make the order a tab. This allows you to initiate a payment and complete the checkout after the customer has added additional items. When viewed from the Manage screen, this order will appear as an orange bubble with the customer’s name. Please watch this OrderPort University Video.
Edited Orders:
From the customer’s account history or the Reports page within the Point of Sale, you have the ability to edit an already paid order. When you open this order, you can adjust products, discounts, and more. When viewed from the Manage screen, this order will appear as a red bubble with the customer’s name.
Running a Transaction
Starting an Order:
To start an order, navigate to the Manage screen. If the order is for an existing customer, enter their name next to the Start button. Once you locate the customer, tap on their name. If the customer is not an existing member, simply select Start. You will then be prompted to select the number of guests and their seating location. Watch this OrderPort University Video.

Selecting Where to Sit:
OrderPort has three different options for seating customers. These options will only appear if Table Numbers are enabled. This setting can be turned on in the POS Settings module within OrderPort Admin. The first option is Table: In the top-left corner of the pop-up, there is a table icon. Selecting this icon will take you to the Table Map, where you can choose a table.
The second option is Bar. This allows you to seat the customer without assigning a table. The third option is To-Go Orders.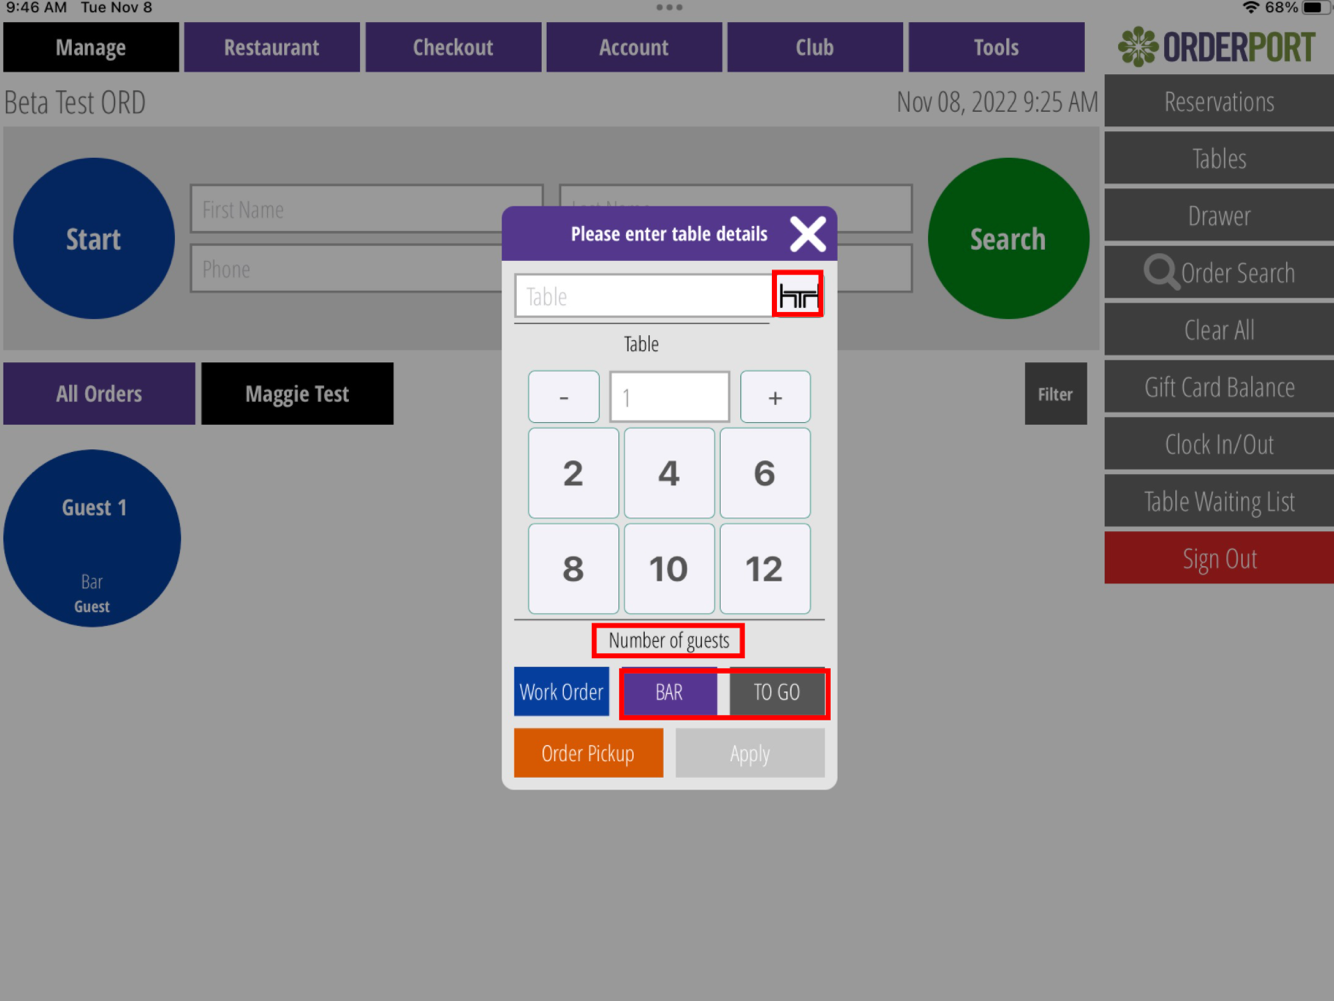
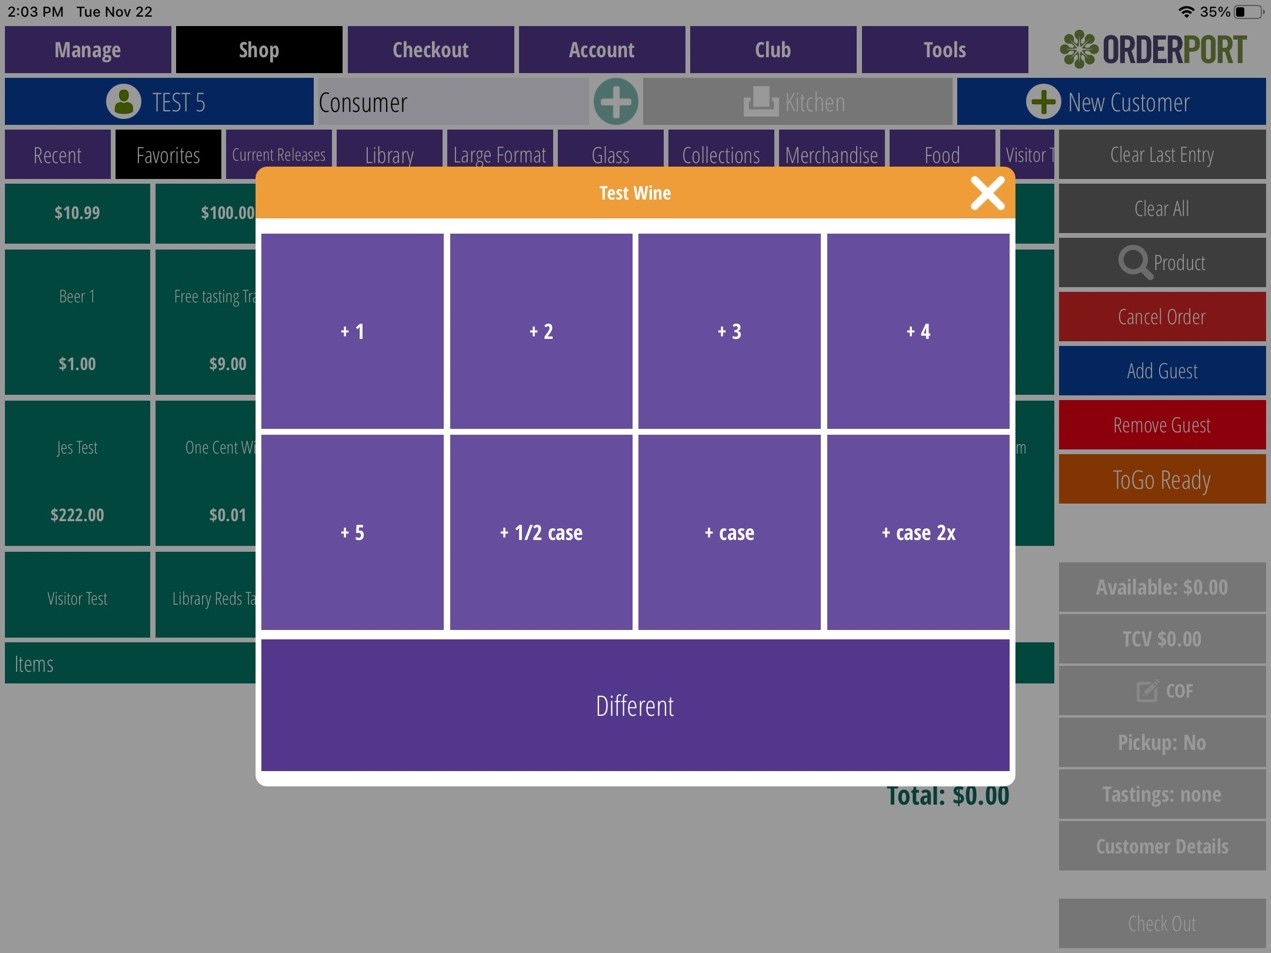
Choosing Products
Once the order is started, you will be taken to the Shop page. At the top of the screen, you will see purple buttons labeled with product group names. Selecting these buttons allows you to browse and find the desired products. You can also search for a product using the search feature on the right side of the page.
Tapping a product will add one item to the cart. To add multiple quantities of the same product, tap and hold the item. To remove a product from the cart, tap the red X next to that product. Once a product is in the cart, there are additional actions you can take. Tapping and holding the product will allow you to add custom notes.
From this page, you also have the option to cancel an order, add or remove guests, edit a customer’s card on file, view the number of free tastings available, and view the customer’s TCV (Total Customer Value).

Sending Orders to the Kitchen or Bar:
Once products have been selected, click the green Kitchen button. This will open a pop-up with two tabs. The first tab is Kitchen Items. Products listed here will be sent to your kitchen printer. The second tab is Bar Items. Products listed here will be sent to your bar printer. Select the purple Print button. The green boxes indicate which printers are available for that type of product. The two blue buttons are the print buttons. Each product will only print once unless you choose to reprint or print the entire ticket.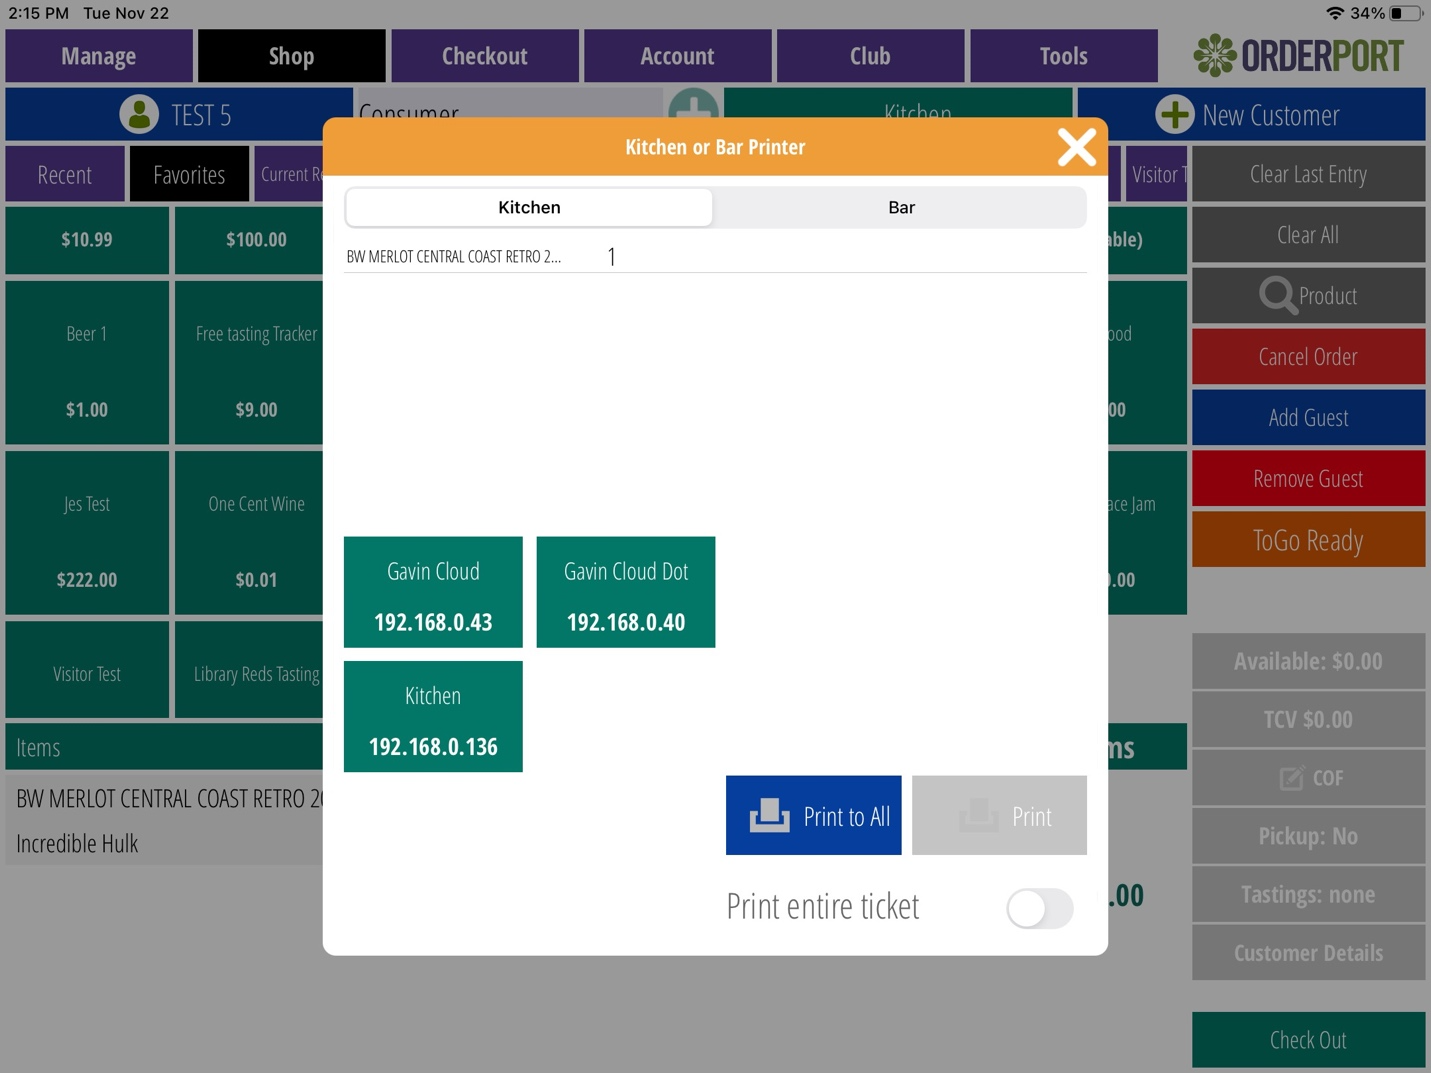
Checkout:
Once the customer is ready to check out, click the Checkout button. Any applicable discounts will be automatically applied on this page. If you need to add a custom discount, use the Quick Discount option. Then, select the method of payment.

Credit Card:
A new window will open, prompting you to insert, swipe, or tap the card on your card reader. The full amount, including the tip, will be charged to the card unless a split payment was arranged beforehand. When the payment is accepted, the window will display “Thank You.” Return the card to the customer.
Card on File:
Tap the On File button on the checkout screen to begin a card-on-file transaction. A new window will open, listing the customer’s cards on file. Tap the card to be used, then tap Submit. If the customer wishes to update or remove a card on file, you can do so here.
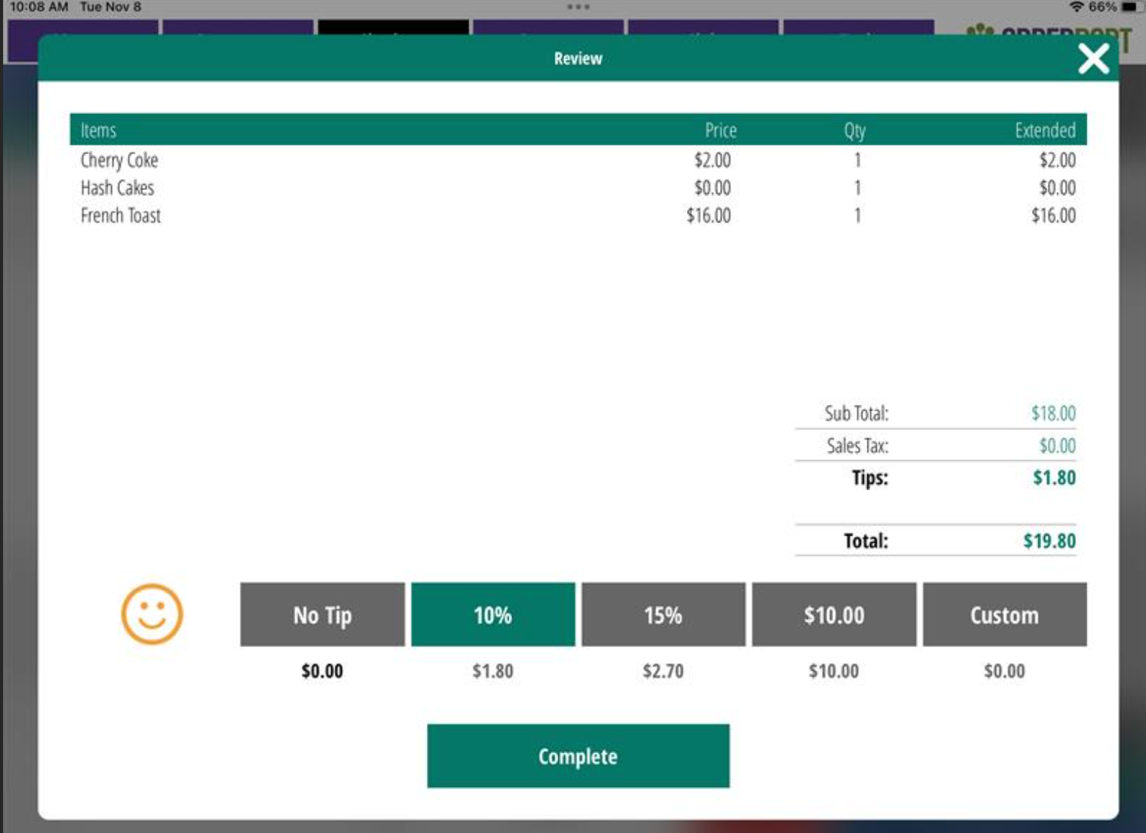
Completing a Transaction:
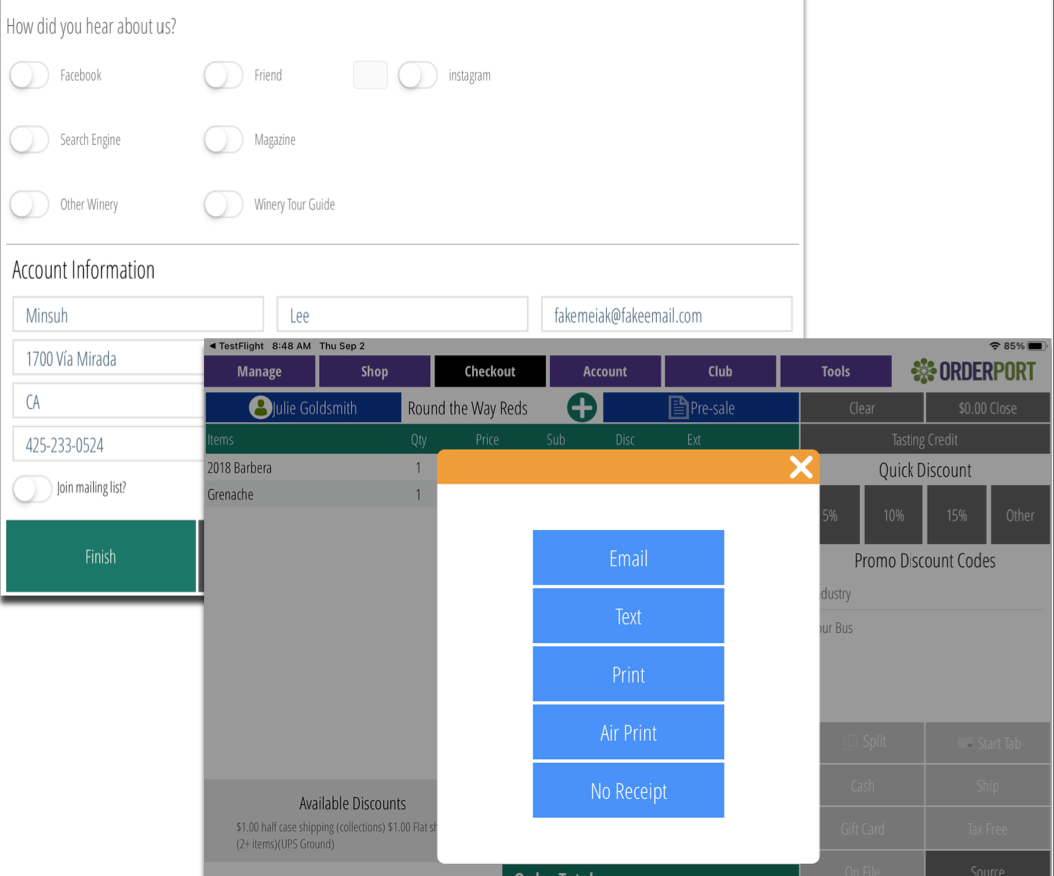
When you tap Next, the Complete Checkout screen will appear. This allows you to capture customer information, send or print a receipt, and complete the transaction. Once you tap Finish, you will be redirected to the Manage screen.
If the customer has an account, the receipt options will appear on the checkout screen. Tap the customer’s preferred option, and you will be redirected to the Manage screen once the process is complete.
Running a Tab
Once you reach the Checkout screen, instead of checking the customer out completely, select Start a Tab. You will need to choose the payment method for starting the tab.
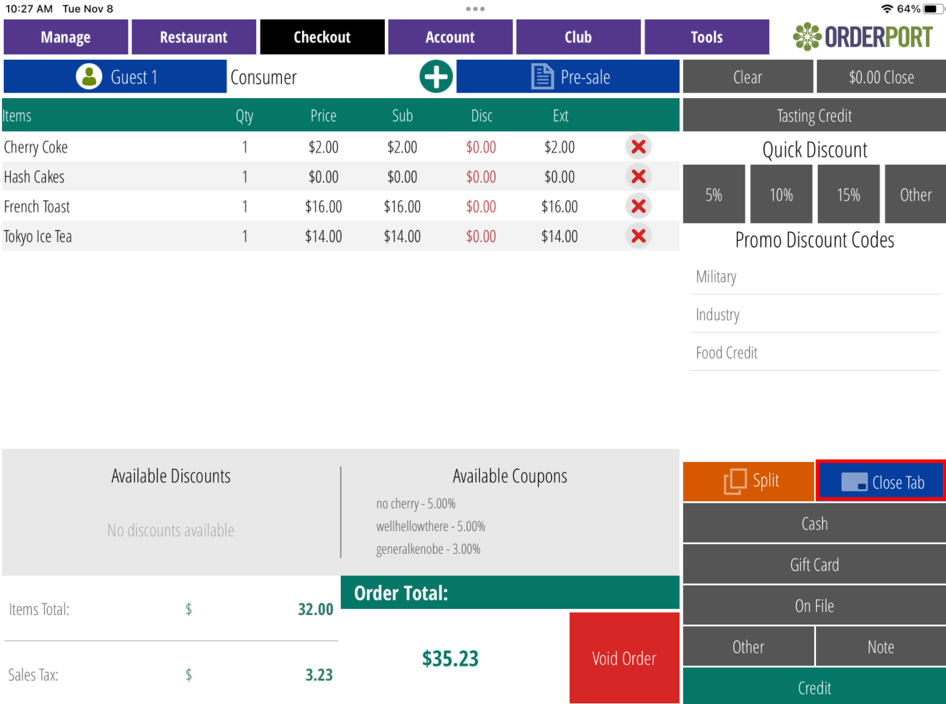
You can then continue adding products to the cart until the customer is ready to close their tab. When ready, go to Checkout and select the Close Tab button.
If the tab was started with a card, the system will ask if you want to close the tab with the same card. If you select Yes, the customer will be prompted to select a tip. If not, choose a different payment method and proceed with checkout.
Running a Split Transaction
Once you have selected your products and the customers are ready to check out, select the Orange Split button on the checkout screen. You will be asked how you would like to split the transaction. You can choose to Split Evenly or Split Between Guests. Watch this OrderPort University Video.

Split Evenly:
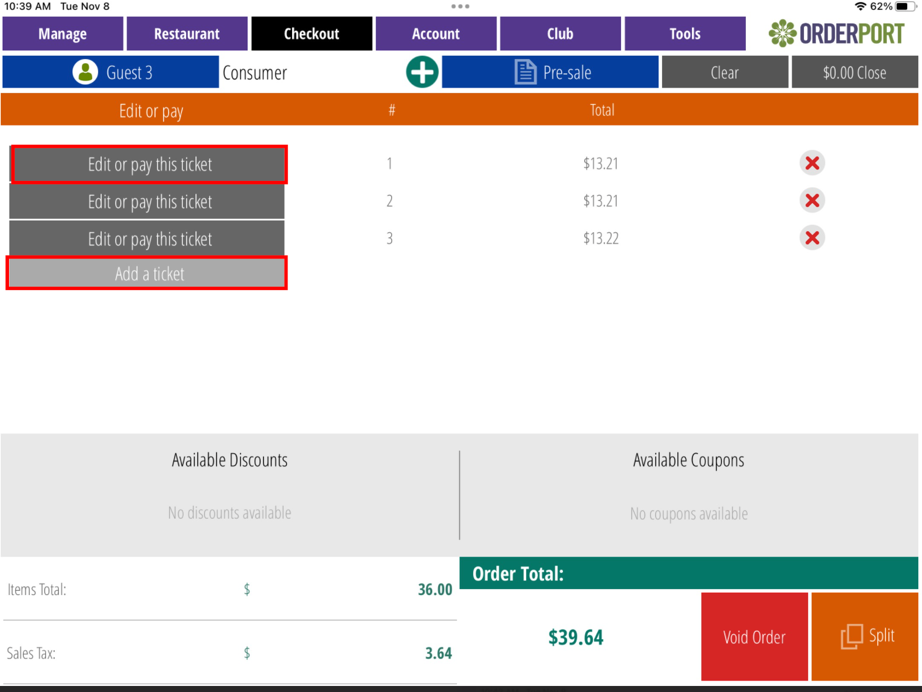
Selecting Split Evenly will bring you to a screen where you can choose how many ways to split the transaction. For example, if you want to split the transaction three ways, select Add a Ticket two times. When you are ready to pay a ticket, select Edit or Pay This Ticket. If necessary, you can adjust the ticket amount and then select the method of payment.
After all tickets are paid, you will need to close any tickets labeled Close. Closing a ticket is when the tip amount is entered. You can also refund an already paid ticket if a mistake was made.
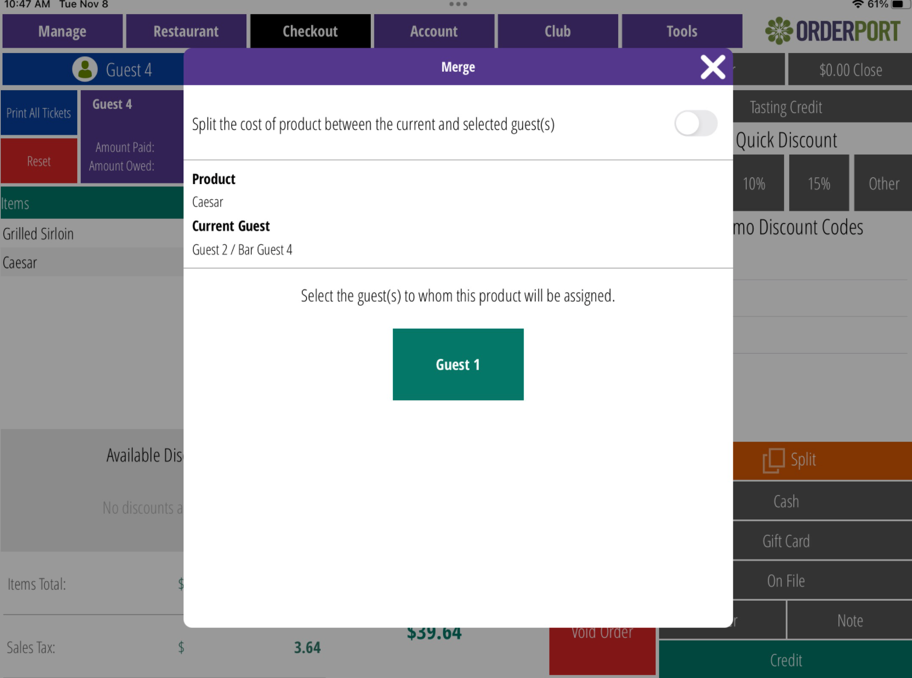
Split Between Guests:
Selecting Split Between Guests will divide the ticket based on the products assigned to each guest. If a product is assigned to the wrong guest or you want to split the cost of a product between multiple guests, tap and hold the product. This will bring you to a page where you can either split the payment or reassign the product to a different guest.

Tap on each guest at the top of the screen to pay for their ticket. The selected guest will be displayed in a black box, while all other guests will appear in purple. You will need to close each of these transactions individually.
Standard Payment Methods
When you are using the Point of Sale, there are many different payment methods available. Some of these require you to enable them in OrderPort Administration.
Credit Card – At checkout, select the Credit button. If you have a card reader connected, it will prompt you to insert or tap the card. If no card reader is connected, you will be prompted to manually key in the card number. This payment method will not save the card information unless you are using a tab.
Card on File – To check out using a card on file, you must be logged into an account that already has a card saved. At checkout, select On File to view the customer’s saved cards. Choose the desired card and click Proceed. Watch this OrderPort University Video.
Adding/Updating a Card on File – From the account page or the shop page, you will see a Card on File section. Clicking this will take you to the Card on File page. To add a new card, click Add. If a card reader is paired, you can tap or insert the card; otherwise, you will need to manually enter the card details. After entering the card number, select a billing address. To update an existing card, select the desired card from the list and click Update.
Cash – When you select Cash, enter the amount provided by the customer. If you have an electronic cash drawer connected, it will open once the amount is entered. Please note: before proceeding, review the change amount, as this is the only screen that displays the required change.
Gift Card – OrderPort offers a Gift Card module that allows you to sell both electronic and physical gift cards. If this module is enabled, you can enter the gift card number and proceed to checkout. Please note that when selecting Gift Card, there are two tabs at the top: Gift Card and Gift Certificate. Electronic gift cards are not gift certificates. Be sure to enter gift cards only in the Gift Card tab.
Gift Certificate – This payment method allows wineries to create their own gift certificates that are tracked outside of OrderPort. These may include mail-in ads or paper coupons for a specific dollar amount. To use this payment method, select Gift Card, then choose Gift Certificate.
Other Payment Methods
At checkout, there is a button called Other Payment Methods. This includes Member Account, Check, and any additional payment methods you have set up in the Payment Processing module. Watch this OrderPort University Video.
Check – This option allows you to enter a check number. After placing the order, you will need to approve that the payment was received in OrderPort Administration.
Account – Member Account funds function like in-store credit. In the Point of Sale, on the Shop screen, any available customer funds will be displayed on the right-hand side of the screen. Customers can earn these funds through refunds and subscription clubs. For more information, please watch the related OrderPort University video.
Selling Gift Cards
Create a gift card product and add it to a Point of Sale group. For more information on creating gift card products, please review this guide. After the item is available in the Point of Sale, adding it to the cart will prompt you to select whether the gift card is physical or electronic. If you choose a physical gift card, you will need to enter the physical card number at checkout. For more information, please watch the OrderPort University video.
Printing
There are three types of printing on the Point of Sale. For assistance with pairing your devices, please see the devices section of this guide or contact helpdesk@orderport.net.
Kitchen
When you are on the Shop screen, there is a green button labeled Kitchen. This allows you to send items from the customer’s order to be printed in the kitchen so staff can begin preparing the order.
In the Catalog Manager, each item has a dropdown labeled “Point of Sale Printer Mode.” In order for an item to be sent to the kitchen printer, you must select Kitchen from this dropdown.
 You will also need to ensure a printer is set up as a kitchen printer. In the Point of Sale module, navigate to Printers and Cash Drawer, select the desired printer, change the printer type to Kitchen, and save your changes. For some smaller wineries, you may only have one printer that you want to use for both kitchen and receipt printing. In this case, set the printer type to Kitchen; it will still be available for selection as your receipt printer when you sign in to the Point of Sale.
When you select the Kitchen button from the Shop screen, any items marked as Kitchen will populate on the first page labeled Kitchen. You will also see all printers that have been categorized as kitchen printers. Some wineries may have multiple kitchen printers—select the desired printer and click Print. If you want the order to go to every kitchen printer, click Print to All.
Once an item has been printed, it will no longer appear on this page. If you need to reprint an item, use the toggle at the bottom of the page labeled “Print Entire Ticket.”
Bar
When you are on the Shop screen, there is a green button labeled Kitchen. This allows you to send items from the customer’s order to be printed in the Bar so staff can begin preparing the order.
In the Catalog Manager, each item has a dropdown labeled “Point of Sale Printer Mode.” In order for an item to be sent to the bar printer, you must select bar from this dropdown.

You will also need to ensure a printer is set up as a bar printer. In the Point of Sale module, navigate to Printers and Cash Drawer, select the desired printer, change the printer type to bar, and save your changes. For some smaller wineries, you may only have one printer that you want to use for both bar and receipt printing. In this case, set the printer type to bar; it will still be available for selection as your receipt printer when you sign in to the Point of Sale.
When you select the Kitchen button from the Shop screen, any items marked as Kitchen will populate on the first page labeled Kitchen. There is a second tab labeled Bar, this is where you will find your bar items. You will also see all printers that have been categorized as bar printers. Some wineries may have multiple bar printers—select the desired printer and click Print. If you want the order to go to every kitchen printer, click Print to All.
Once an item has been printed, it will no longer appear on this page. If you need to reprint an item, use the toggle at the bottom of the page labeled “Print Entire Ticket.”
Reciept
When you are on the Checkout screen and have completed an order, you will be asked how you would like to send the receipt. This screen may look different for members versus non-members, as non-members will be prompted to sign up first. Once you select Print, the receipt will be printed.
If you do not have a printer selected, nothing will print. There are two ways to ensure you have a receipt printer selected:
At sign-in:
When you first sign in to the Point of Sale and select the location, a pop-up will appear with all available printers. Select the printer you want your receipts to print from.From Tools & About:
If you need to change the printer or are unsure which printer is selected, navigate to the Tools & About page. There will be a gray box that either displays the printer name or says “Printer/Drawer is not set.” Click the Edit button to change the selected printer.
Another receipt option is the Pre-Sale Receipt. This button is located at checkout and allows you to print a receipt prior to taking payment. This is useful if you have guests seated at a table and would like to bring them their receipt in advance.
Reservations
In order for the Reservations feature to be available in the app, you must enable the Reservations Module. To do this, please contact helpdesk@orderport.com. Review the Restaurant Setup Guide and OrderPort University training to complete this setup. Please watch this OrderPort University Video.

Viewing Existing Reservations:
The Reservations tab on the OrderPort app allows you to view existing reservations. On the right-hand side of the app, in the gray bar, there is a button labeled Reservations. Selecting this will take you to a screen displaying all reservation areas for the current tasting room location.
Any existing reservations will appear under the All Areas tab in the Reservations section. This allows you to see everyone scheduled to visit the tasting room today. You can click through the areas to view the seating area or experience they selected on the webstore. To view reservations for a different date, select the blue Change Date button at the top of the screen.
Capacity View:
There are two different views for the All Areas list. The first and default view is the Capacity View.
List View:
The second view option is the List View. To switch to this view, select the List button at the top of the screen.
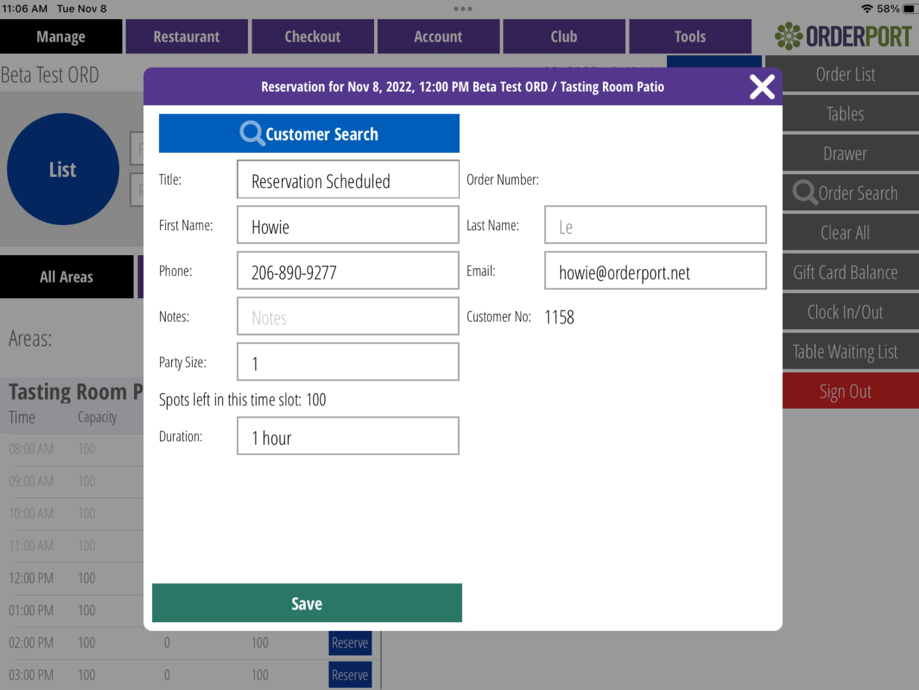
Creating New Reservations:
If you need to create a new reservation, you can do so through the app. First, select the area where the customer wishes to be seated. The process will differ depending on whether the area uses tables or not.
With Tables:
After selecting an area with tables, you will be brought to the table grid, where you can select a table and a time slot for the reservation. Open tables are shown in green. After selecting a time slot, a pop-up will prompt you to create the reservation. From here, you can search for an existing customer or manually enter their information.
Without Tables:
After selecting an area without tables, you will be taken to a screen displaying all available time slots. Select one of the blue Reserve buttons. From here, you can search for an existing customer or manually enter their information.
With Product Purchase:
If the selected area requires a product purchase, after clicking Save, you will be prompted to select products. If you select zero-dollar products, you will need to click Save again to complete the reservation. If you select products with a required deposit, you will be taken to a screen showing the total amount owed. After getting approval from the customer, select Complete, and you will be prompted to choose a payment method.
Canceling / Editing Reservations:
To edit an existing reservation, locate it under the All Areas tab and click on the customer’s name. This will open the reservation, allowing you to add guests, adjust the reservation status, or change the reservation time.
To cancel a reservation, select the Status tab and choose Canceled.
To change the date or time of a reservation, select the blue Change Time button. A calendar will appear, allowing you to select the new date and time.
Seating Customers:
When the customer arrives at the tasting room, select Start Order. You can adjust the number of guests and assign a table when seating them. This will create a light blue order that includes any pre-selected items.
Table Map
The OrderPort Table Map provides a visual and interactive view of your table layout. To access this from the OrderPort Five app, select the Tables button. If you have multiple maps, scroll left or right to view other areas. Green tables are available and ready for customers. After selecting a table, you can search for the customer and enter the number of guests.
If you select too many guests for a table, the app will notify you to select an additional table or indicate that the table is not combinable.
Once all requirements are met, select Seat Guests.
Table Map Starting Screen:
In the Point of Sale module of OrderPort Administration, you can set the landing page for each location under the Settings tab. Set the landing page to Table Map to have it display when opening the app.
Table Map Editor:
Table maps and layouts are customized in the Point of Sale. In this way, you can have customers reserve specific tables that are tied to physical locations. Only users with reservations module access on OrderPort admin will have access to the table maps. Go to the Tools tab, then tap Table Maps.

You will see each area listed on the top of this tab. Each area will have a list of tables. On the right, you will find the layout settings. By tapping on Map, you can choose how these tables are mapped. By setting up the map to be similar to the physical space of the area, you can easily associate reservations and customers with tables.
On the right, you can toggle tables and change the style of the tables by tapping on the three dots. You can take these tables and drag them across the screen to move them. For advanced features, you can use the buttons at the bottom. The first button allows you to select more than one at a time. After selecting tables, you can apply any of the other transformations on those tables. Once finished with your customizations, tap save.
Table Alignment.
 Toggles between single selection and multi selection.

45-degree Rotation

Left Alignment

Right Alignment

Top Alignment

Bottom Alignment

Space in between vertically

Space in between horizontally
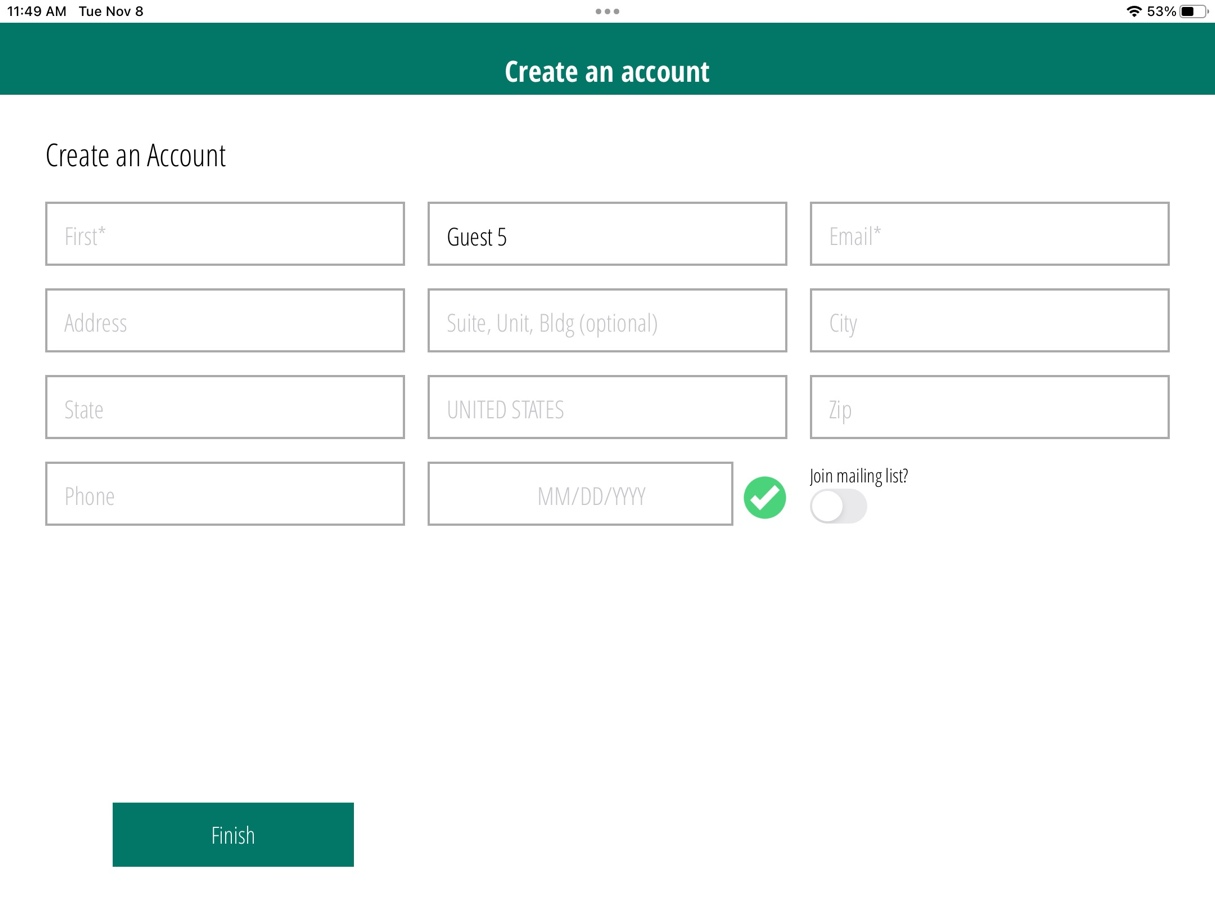
Creating a Customer Account
If you are checking out an order for a customer who does not have an account with the winery, you can set one up after the transaction is complete. At the end of every guest order, you will be directed to the Create an Account page. Enter at a minimum the customer’s first and last name, along with their email address. Please watch this OrderPort University Video.
Adding a Wine Club Member
From the app, select the Club tab. This will take you to a page where you can enter an email address. If the email is attached to an existing account, the customer’s account will appear, allowing you to add a new club membership. If the email is not associated with an account, you will be prompted to enter all account information and select their wine club. Watch this OrderPort University Video.


Shipping an Order
To ship wines from the tasting room, add all products as if creating a normal order. Note: This must be done as a separate transaction from any in-house purchases. Please watch this OrderPort University Training.
Step One: Checkout Screen
To ship, you must be on the Checkout screen. Ensure all products are added prior to shipping. You can edit an already processed order if you need to ship that order. On the checkout screen, on the left side, you will see payment method options. Among them, there is a Ship button.
Step Two: Estimated Rates Screen
After selecting the Ship button, you will be brought to the Estimated Rates screen. This page allows you to enter a zip code to see approximate shipping costs. It also provides a list of states your winery can ship to, helping you confirm shipping eligibility without entering all customer information.
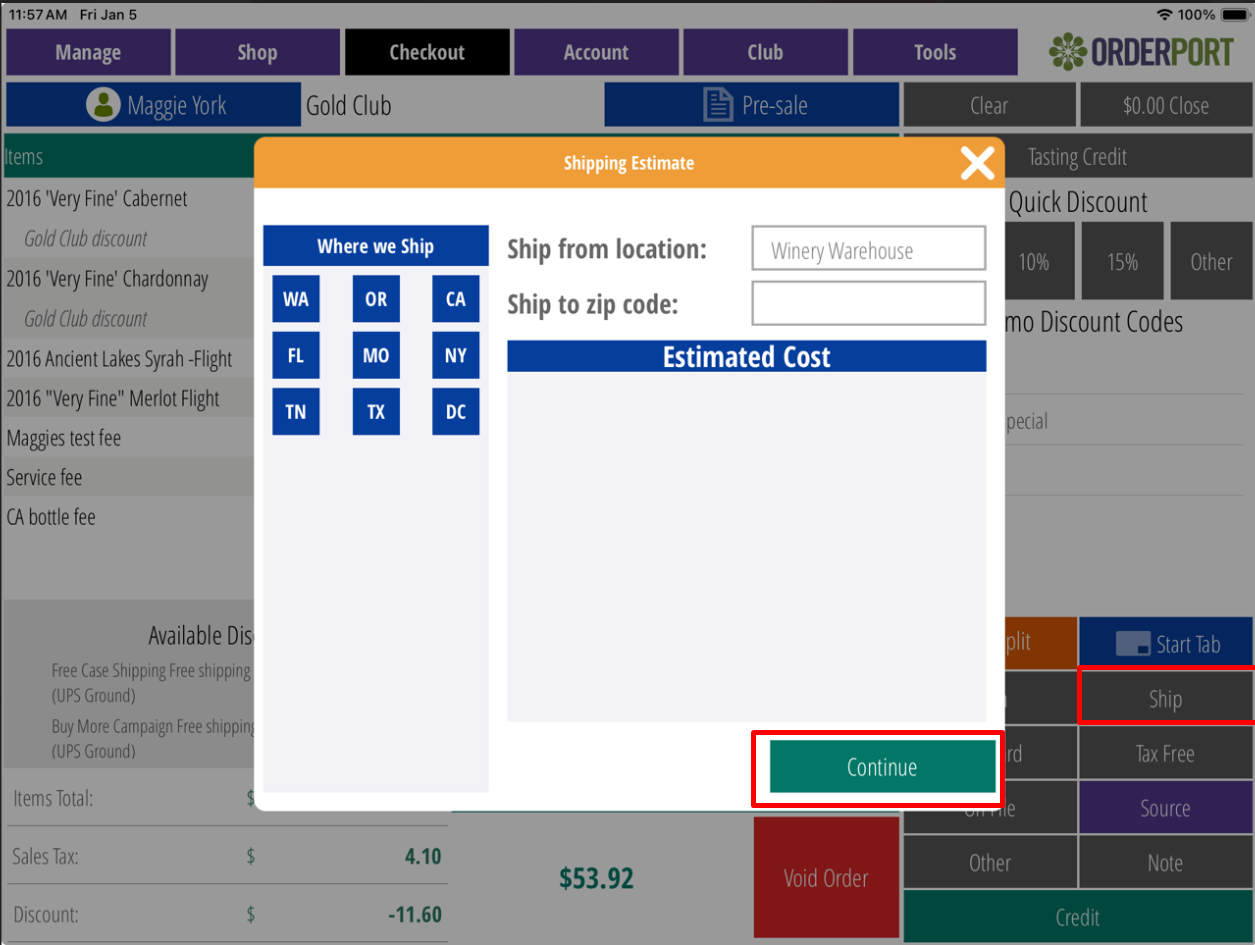
This step is optional; you can select Continue without entering a state or zip code.
Step Three: Billing and Shipping Address
If this order is assigned to a customer with saved billing and shipping information, it will auto-populate. If no customer is assigned, select the Search Customer button to see if they have an account to assign to this order. An account is not required; shipping information can be manually entered. Keep in mind that many shipping carriers require a phone number and birthday in the shipping address. When finished, select Save and Continue.
Step Four: Selecting Shipping Rates
All available shipping methods for the address will populate along with the carrier rates. Select the desired method. If shipping at a later date, you can add a Future Ship Date on this page. Click Continue.
Optional: Manually Adjusting Shipping Price
After shipping has been applied to an order, if you need to manually adjust the price, navigate to the Checkout screen. Next to the shipping cost, there will be an orange pencil icon. Click it to adjust the price. Make sure to Save after making changes.
Updating and Reviewing Customer Accounts
If you need to review or adjust any of your customer's account information, you can do so through the Account tab. On the right-hand side, there is a blue Search Customer button. From here, you can view their name, email, customer class status, birthday, and phone number at the top of the screen. Directly below this are some light blue buttons.
Customer Details:
Here you can view recent purchases, favorite items, loyalty points, account notes, and their club membership. If you need to adjust someone’s club membership, you can select it from this page. You can Update, Change, or Cancel their club membership.
Order History:
Here you can view order details, edit orders, release pick-up orders, and take payment on unpaid club orders.
Credit Card:
Here you can Add, Update, and Delete cards on file. You can also assign a card on file as the default card for a customer’s Wine Club account.
Address:
Here you can update customers’ shipping and billing addresses. Secondary addresses can also be added.
Releasing Pickup Orders
If a customer needs to pick up a wine club order, you can release it through the Account tab. After searching for the customer, select the Order History button. You will see a list of all the customer’s associated orders. Next to each order that needs to be picked up is a blue Release button. Please watch this OrderPort University Video.
Refunding a Transaction
To refund a transaction, navigate to Tools and then the Reports tab. At the bottom of the page, you will find the Completed Orders tab. Tap the order and select Full Refund. Watch this OrderPort University Video.
If you need to make a partial refund or edit an order, you can do so by selecting Edit Order.

Editing an Order
To edit an order, navigate to Tools and then the Reports tab. At the bottom of the page, locate the Completed Orders tab. If you are searching for a previous order, you can change the date at the top of the page. Tap the order and select Edit Order. Please watch this OrderPort University Video.

You can:
- Add or remove items
- Change item prices
- Add or remove shipping
- Edit the shipping price
- Add or remove sales tax
- Add a new shipping address or change the shipping method
While the order is open in the POS, it will appear on the Manage page in red. In the admin section, it will be marked as "OpenForEditOnPOS", preventing multiple people from editing the order simultaneously.
You can also edit an order through the Account tab. After searching for a customer, select the Order History button. A list of all the customers’ associated orders will appear. Next to each order is a red Edit Order button.
Physical Inventory Count
The inventory count is completed in the Point of Sale. Open OrderPort on your device, log in, go to the Tools tab, then navigate to the About section. The last button on the right is Physical Count.
Enter the physical product count in the field on the right for each product being counted. Any products left blank will be ignored for this count.
To narrow down the product list, use the Filter By button or the search function. Once finished, tap Count Completed. For more information, please watch the OrderPort University video.
Clock In / Clock Out
Clocking In
On the left-hand side of the app, there is a Clock In/Out button. Selecting this will take you to the Clock In/Out page. Enter your PIN and select the green In button. Please watch this OrderPort University Video.
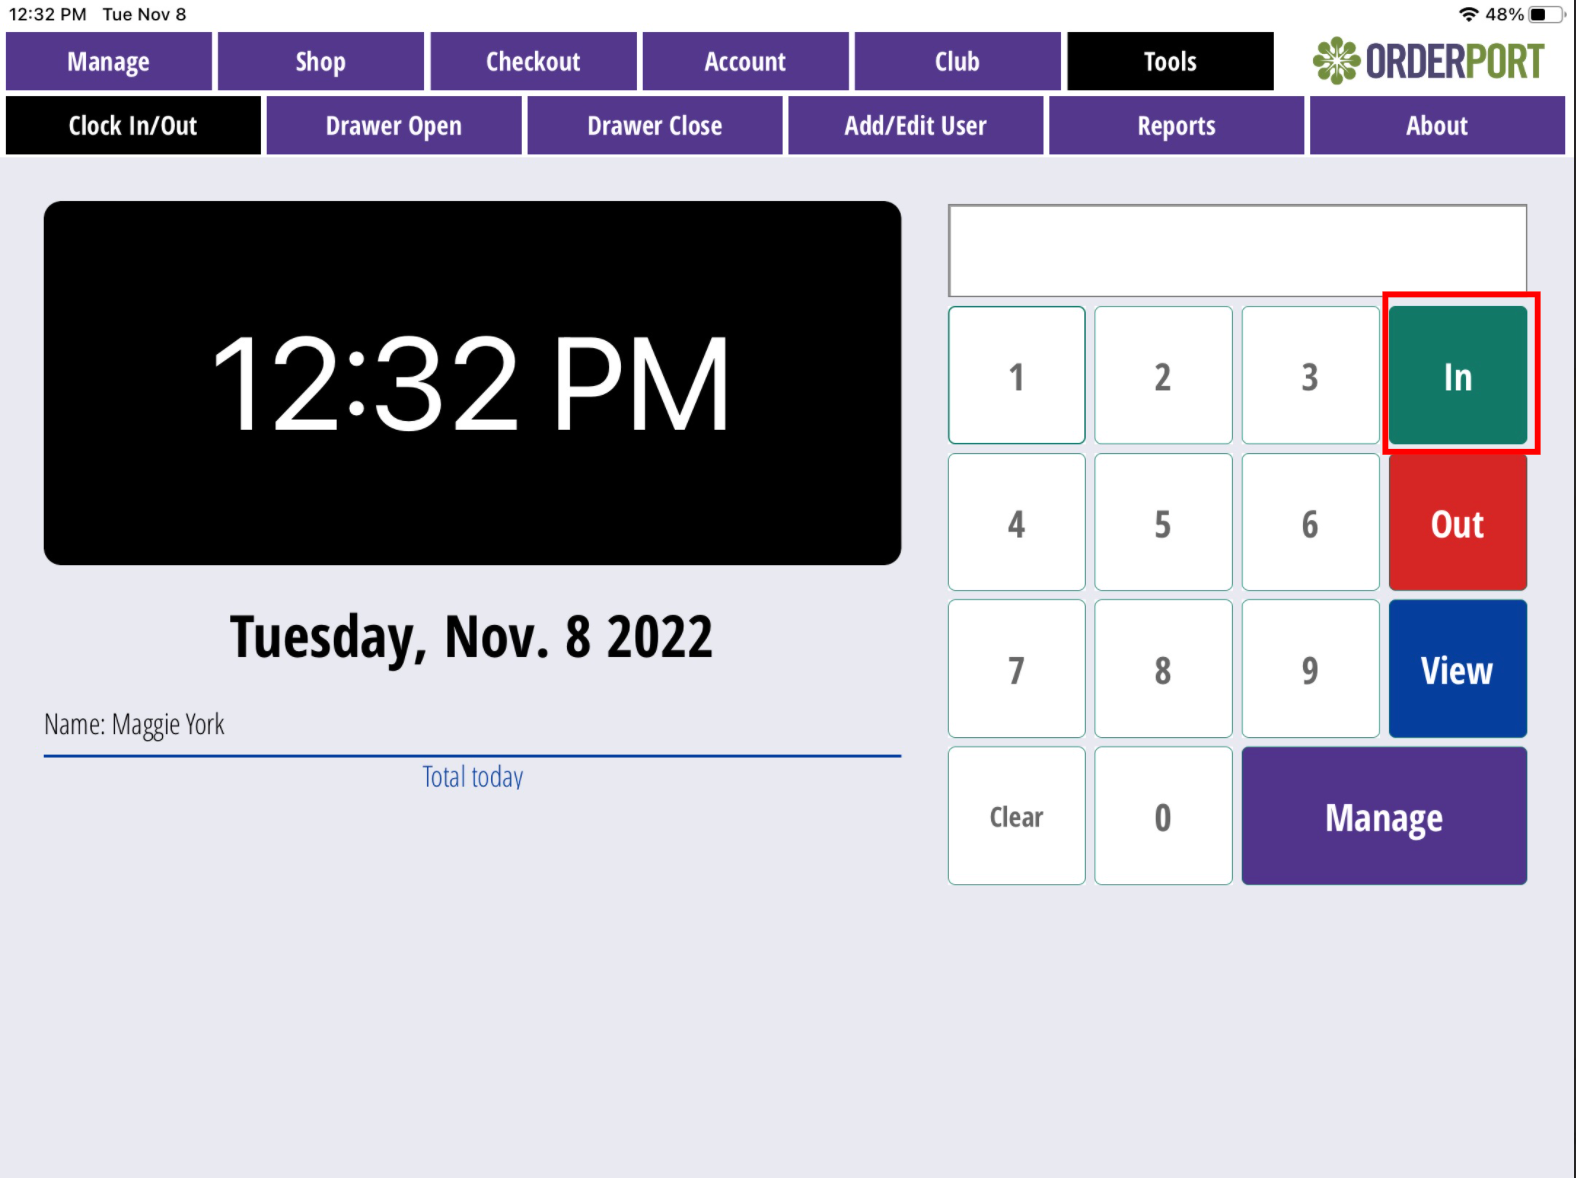
Clocking Out
On the left-hand side of the app, there is a Clock In/Out button. Selecting this will take you to the Clock In/Out page. Enter your PIN and select the red Out button.

View
This button is accessible to all users. It displays the current employees who have clocked in, along with their recorded hours for the day, week, and month.

Manage
This button is accessible to managers only. Here, you can view and edit an employee’s existing timecards. Select the Edit button on the desired day, then choose the employee you want to edit.
Use the Add In/Out button to create a new adjustment, or select one of the existing In/Out entries to edit a current time slot.
Drawer Open
This report should be reviewed every morning before opening for business. It will auto-fill with the last saved information from the previous day. The values shown should match the cash in your drawer at the start of the day. Please watch this OrderPort University Video.
Drawer Close
This report should be completed daily after the store closes. The amounts should match the total number of bills, coins, checks, and credit card transactions processed throughout the day.
Reports
Reports can be accessed under Tools > Reports, in the section labeled Available Reports. This section contains all reports available within the Point of Sale.
If you need a report that is not listed here, it must be run through OrderPort Administration. To run a report, tap the desired report, and it will automatically generate for the current day. You can run reports for a different date by selecting Change Date after a report has run.
The Cash Drawer Open and Cash Drawer Close reports in this section are not adjustable. To make adjustments, use the Cash Drawer Open and Cash Drawer Close tabs.
Devices
OrderPort 5 is compatible with BBPOS card readers, Socket Mobile barcode scanners, and Star printers. For more information on which versions are compatible and how to set them up, please review the guides and training videos below.
Card Readers:
Pairing Guide and OrderPort University Video
Printers:
Pairing Guide and OrderPort University Video
Barcode Scanners:
Pairing Guide and OrderPort University Video
FAQ's
How do I add or remove wine to an order that is already paid using OrderPort Five?
- Go to reports
- Touch the "Order search" button. You can search by first name, last name, order number or date
- Select the order and if you select the wrong one you would select "Close this order without Making Changes."
- If this is the correct order, you would Edit the order. You can add items to the order, remove items, change item prices, add shipping, remove shipping, edit the shipping price, add sales tax, remove sales tax, add a new shipping address or change the shipping method
- While the order is open in the POS, it will appear in the manage page in red and in the admin section, it will be marked as "OpenForEditOnPOS" which will prevent the order from being edited on by multiple people.
Can I change the default number of guests on the Order pop-up?
The default maximum number of guests is 12. You can add or subtract guests as needed; however, the default number is not customizable at this time.

Can I make any edits to a previous day’s entries for Cash Drawer Open or Cash Drawer Close?
Example:
You forgot to clear the previous day’s entries for a $100 bill and a $50 bill in the Cash Drawer Close, causing the system to show $150 in sales that is not correct.
The system is intentionally designed so that Cash Drawer entries cannot be edited. You will need to notify your Accounting Department so they can make the appropriate adjustment on their end with proper documentation.
What is the best way to run several orders for multiple people and use the same credit card for all orders so that it does not decline?
In some situations, multiple orders need to be charged to the same credit card back-to-back. The recommended process is outlined in the attached documentation. This helps prevent transactions from being declined due to fraud detection or card issuer restrictions.
Would you set up an event tasting room the same way you would set up a normal tasting room?
Inventory > Add New > Make note that this is an event location > Save Changes.
There are no charges for an Event Tasting Room, unlike an additional physical location, which requires an extra charge.
How do you make a product or wine "Club Only" on the Point of Sale?
At this time, you cannot make a product Wine Club–only directly in the Point of Sale. You will need to inform staff which products are exclusive to Wine Club members or create a separate product group for Wine Club–only items.
On the webstore, you can set a product’s status to Club Only within the product details and mark it as Consumer Inactive.
Why does the POS order display a different email than the one attached to the account?
This occurs when the cashier sends a receipt to a different email address at checkout. When a receipt is sent to a new email, the system updates the email address on the order to match the one used for the receipt. This behavior is intentional.
Can the Quick Order Feature be Disabled?
Yes. This can be done through OrderPort Administration> Point of Sale module > Settings > Check/Uncheck the box next to "Quick Order." > Save Changes.
Afterward, you would log off and in to the app to apply these changes. You can also reload the catalog manager for the same results.
Can I use Visa Gift cards or other credit card brand gift cards at checkout?
We do not recommend accepting credit card brand gift cards unless the customer knows the exact balance on the card and you do not charge more than that amount. To safely process these cards without knowing the balance, the payment processor must support a Return Balance System.
OrderPort will not issue credits to wineries for orders processed on cards with insufficient funds. Always verify the card balance before use.
Return Balance System Overview
When a credit card brand gift card is processed, the payment processor must support a Return Balance system to verify the remaining balance. Without this feature, the processor may approve charges that exceed the available balance, resulting in lost funds
OpenEdge
OpenEdge does not have a return balance function.
- We do not recommend a client take a gift card from any Credit Card brand unless the customer knows how much is left on the card.
Worldpay
Worldpay does support a Return Balance function; however, very specific steps must be followed for it to work correctly.
Please Note:
The Return Balance feature may work in some cases, but OrderPort cannot guarantee accuracy.
The gift card must be swiped to retrieve the Return Balance. Keyed-in cards will not return a balance.
The Return Balance does not work with Contactless payments.
The card must be pre-authorized to retrieve the Return Balance, and contactless payments remove this functionality.
We do not recommend using a credit card brand gift card to start a tab. If a Return Balance is sent, the system may return an error.
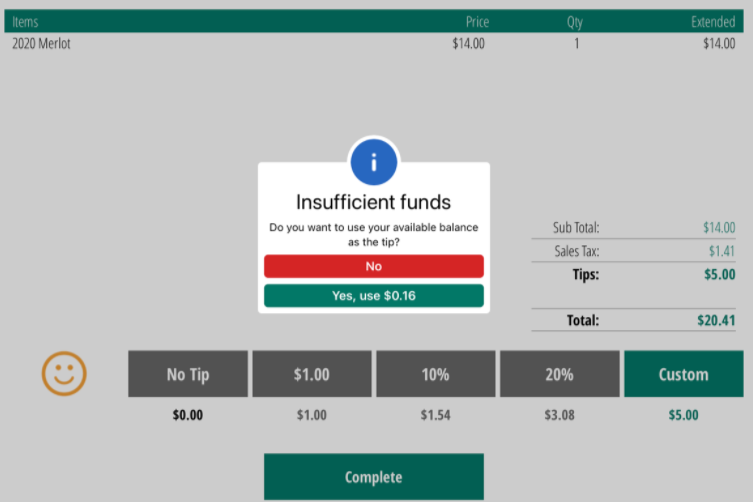
If a gift card is used to pay a Return Balance and the customer attempts to tip more than the remaining balance, an error message will appear showing the amount left on the card
How do I delete a basket? Can I prevent my staff from doing this?
To delete an active order in the Point of Sale, there are a few options.
If an order has not been paid for on the shop screen, there is a Cancel button. Clicking Cancel will delete the active basket. If payment has been attempted in any way, you will receive an error message indicating that a payment attempt was made and the order must be voided instead.
Voiding an order will attempt to cancel the credit card transaction. That said, if payment was attempted multiple times and you are voiding the order due to an error message, we recommend reaching out to helpdesk@orderport.net to confirm the payment was successfully voided. When you void an order, it requires the associate to enter their pin so we can see who deleted the cart.
Another way a basket can be deleted is by resetting a Split by Guest transaction. When you use the Split by Guest feature, OrderPort generates a new order for each guest. The Reset button allows you to reverse the split if you need to add additional items before checkout. When this occurs, the newly generated baskets are deleted.
What is an Orphaned Transaction?
When you are working on an order and receive the Orphaned Transaction error, this is caused by a disconnect between the payment processor and the app at the time of payment. When the app attempts a payment, it sends the payment information to the processor. If a response is not received within a certain amount of time, the order is flagged as orphaned.

This can be caused by slow internet, a service outage with the payment processor, server overload, or any other interruption that may occur.
When you receive the Orphaned Transaction pop-up, the app saves the payment. When you click Continue, the app will attempt to resend the information to the payment processor to close out the order. If it is unable to reconnect and the order remains open, please contact helpdesk@orderport.net
so the order can be closed out for you.
If you notice that you are receiving a high number of orphaned transactions, please review the OrderPort University video on Contactless Checkout. When the Contactless Checkout feature is enabled, there is a reduced risk of orphaned transactions.
What should I do if I have an Order that is stuck on my Point of Sale?
If you have an order that you can not close out we recomened reaching out to our support team at helpdesk@orderport.net or by calling 206 - 464 -1151 for assistance.