All OrderPort Apps are compatible with the same types of printers. However, only certain Star Micronic Printers can be paired. These printers should only be used for Printing Kitchen/Bar tickets and receipts. For shipping label printing please see the Shipping Carrier Printers Documentation.
OrderPort is compatible with Thermal and Dot Matrix Printers. Our Resturant app also supports Cloud Print Features.
TABLE OF CONTENTS
- Standard Thermal Printer
- Alternative Kitchen Printers (dot matrix)
- Deciding how to Pair
- Pairing the Printer
- Inputting it in OrderPort
- Printer Types
- How to select a product printer type
- General Troubleshooting
- Ethernet Troubleshooting
- Wireless Troubleshooting
- Troubleshooting Tips if the printers ip address is all "0.0.0.0.0.0"
- Compatibility requirements for TSP100III WLAN:
- Do you have a Cash Drawer?
- Do I have to reset and Repair my Printer every time this happens?
- Is there any way that you can not keep resetting the Printer if this happens often?
- How do you print a receipt on the Point of Sale?
- How does Kitchen/Bar Printing work?
- What is the difference between a thermal printer and Dot Matrix.
- Do you have Local Network turned on in Settings?
- Receipt Printer Printing Gibberish
Standard Thermal Printer
Star TSP100ECO (LAN)
- Star TSP100III (LAN)
- Star TSP100III (WLAN)
- mC-Print3 (LAN)
Wireless printers for printing thermal receipts from the OrderPort Point of Sale.
Note: Wireless printers do not work with 5G Networks. if you have a 5G network please use (LAN) printers.
Alternative Kitchen Printers (dot matrix)
SP700
Used to send food orders to the kitchen from the OrderPort Point of Sale. Connects to the network with an ethernet cable.
*Must have network card IFBD-HE07/08
Deciding how to Pair
For Wi-Fi printers, there are two pairing options: Dynamic and Static. The easiest and most commonly used method is Dynamic. This method allows for easier setup; however, any time the power goes out or the router is restarted, the IP address will change and you will need to re-pair the printers.
The Static option allows you to manually set the IP address so it never changes. Even if the power goes out, the printer will remain connected to the same router. However, this setup can be more complicated. When you reach step 5 in the pairing process, you will need to decide which route to take.
Pairing the Printer
OrderPort is compatible with Wi-Fi and ethernet printers. Determine what type of printer you have and follow the Pairing instructions accordingly. If you are re-pairing a printer then make sure to follow the Resetting the Printer instructions prior to pairing.
Resetting the printer
- Turn off the printer by using the switch on the left-hand side.
- Use a paper clip or pencil to hold down the red reset button on the back of the printer. While holding down reset, turn the switch on again. Keep holding down the reset button until the printer clicks twice.
- At this point, the printer should be reset and ready to be set up using the steps below.
Connecting a Wi-Fi printer
Some routers have a WPS button on the back which allows for quick pairing. If you do not have a "WPS" button on your router or modem, use this method:
Pairing without WPS
1. After resetting the printer, go into the Wi-Fi Settings on the iPad and connect to the printer's network:

2. Once the iPad is connected, go into a browser on your iPad (i.e Safari) and type in "192.168.10.1"

3. Tap "Login"
Username: root
Password: public
You will be prompted with the ability to change the password. You can do this if you want, you will need to remember it for any configuration of the printer in the future, otherwise, tap "Cancel."


4. Now go into the WLAN Settings on the left:
Change the mode to "Infrastructure Mode." Fill out the SSID, Security, And Security Key.

SSID: this is the network name that the printer will be connecting to. This network needs to be the same as what the iPad will connect to when using the POS.
Security: This is the Wi-Fi security type, if you don't know this choose AUTO
Security Key: This is the password for the WiFi network that it is going to be connected to.
After you have filled these out, tap submit.
5. Next, you will need to tap on "IP Parameters". Decide if you want to set the printer to Dynamic or Static. If you decide Dynamic select bubble and make sure that DHCP is enabled.

If you decide to choose static, make sure to use an IP Address that is not currently being used on another device. You will also need to fill out: IP Address, Subnet Mask, and Default Gateway* according to the WiFi network you are trying to connect to. Usually, this can be found by going onto a mobile device and clicking the info button (circle with an I in the middle) next to the wifi network.

*Router=Default Gateway
Once this has been filled out, tap submit. (Note: this IP address will be the same IP used when inputting the printer into OrderPort)
6. Once that has been submitted, tap on the blinking save button on the left.
Make sure "Save->Configuration printing->Restart device" is selected and tap "Execute"

The printer should give a printout with information on the IP Address it is connected to. That Ip address will need to be inputted into OrderPort for the printer IP.
If the IP address is not populated, wait 15-20 seconds after the initial printout. A second receipt should print with the ip address at the bottom. If the receipt still does not provide an ip address, refer to the troubleshooting tips at the bottom of this guide.

Pairing with WPS
1. Press and hold the WPS button (router) and Pair Button (printer) for about 10-15 seconds until a receipt is printed.
2. Us the IP address on the bottom of the receipt to input into OrderPort (Point Of Sale module)

The printer "pair" button will look something like this:

This is what the paper will look like:

Check the "SSID" to make sure that that name matches the WiFi name the iPad will be connected to.
Connecting an Ethernet printer
Plug in your Printer with an ethernet cable and connect that to your router. This should automatically generate an IP address.
1. Turn off the printer, Hold down the Feed button, and Turn the printer back on. This should print out to receipts. Now navigate to the Imputting in OrderPort section.
Inputting it in OrderPort
Once you retrieve the printer's IP address navigate to the Point of Sale Module on OrderPort administration under services. From here you will see a tab called Printers and Cash Drawers.
Click the green add printer button. Here you will be asked to fill out some information.
Name: The display name of the printer
Location: Which tasting room this printer should be associated with
Printer Type: Which Printer type you would like. See the Printer Type Section of this document.
IP Address: The IP address associated with that printer
Port: 9100
Cloud prnt: Should be set to No unless directed otherwise by an OrderPort team member.
Printer Model: Whichever model of the printer was purchased.

Printer Types
There are three printer types you can set your printer to be. The First type is Receipt which is the most common. This type of printer is what will be used to print your customer's Receipt as well as some of the reports from the Point of sale.
The second is Kitchen, this type of printer will be triggered when the kitchen print button on the cart page of the Point of Sale is selected. The items that will be printed here are preset in the catalog manager.
The third is Bar, this type of printer will be triggered when the bar print button on the cart page of the Point of Sale is selected. The items that will be printed here are preset in the catalog manager.
How to select a product printer type
Navigate to the Catalog Manager located under the products section of OrderPort administration. Search for the product and select it. Under the Product info tab, there is a button called Point of Sale Printer mode. Make sure to save changes.

Can I have one Printer a Kitchen or Bar and a Receipt printer?
Yes, you will want to set up your printer as a Kitchen or Bar printer in the Point of Sale module. Next, you will want to scroll down the page and find the add cash drawer button. Name your cash Drawer and select the printer you just set up. Now sign out of the point of sale and when you sign in select the cash drawer as your printer.

General Troubleshooting
Below are some steps to help troubleshoot why your printer is not Pairing.
- Make sure that your Printer is Compatible.
- Check if it is Ethernet or Wireless


- Do you have Local Network Turned on in your App settings. Without this the orderport app will not be able to print. To find this go to iPad Settings > Scroll down on the left hand side and find the OrderPort app > Enable Local Network.
Ethernet Troubleshooting
- Plug it into the router, not a Wi-Fi extender, Airport, or any other device like that.
- Turn the printer off > Hold the feed button while holding the feed button turn the printer back on à Wait till you hear two clicks then let off à it will print the Network Configuration with the IP address under Current IP Parameters Status.
- Now that it is connected to the internet, simply go to the "point of sale" module in Admin > "printers"...or go to "Tools" > "about" on the POS app and add a new printer. Use the IP address that is featured on the bottom of the paper that was printed from the previous step.
- You can look at the paper that is printed upon connection to Wi-Fi, to find the IP address.
- Please Sign Out of the app > Log back in > click on the printer to connect to > Start an order > add an item > go to the Checkout screen> click Presale.
Wireless Troubleshooting
- Note: Wireless printers do not work with 5G Networks. If you have a 5G network please use (LAN) printers.
- Turn the printer off à Hold the feed button while holding the feed button turn the printer back on à wait till you hear two clicks then let off the feed buttonà it will print the Network Configuration with the IP address under Current IP Parameters Status.
- If it prints an IP address other than 192.168.10.1 or 0.0.0.0.0.0, it is connected to the internet, simply go to the "point of sale" module in Admin à"printers"...or go to "Tools" à "about" on the POS app and update the printer. Use the IP address that is featured on the bottom of the paper that was printed from the previous step.
- You can look at the paper that is printed upon connection to Wi-Fi, to find the IP address.
- Please Sign Out of the app à Log back in à click on the printer to connect to à Start an order à add an item à go to the Checkout scream à click Presale.
Troubleshooting Tips if the printers ip address is all "0.0.0.0.0.0"
If you go through the "Connecting the printer to the internet via WiFi" pairing steps and it prints "0.0.0.0.0.0" but the light is hard blue you can go into the "Star Quick Setup Utility" app and find the ip address.
If it's "Link down (IP address cannot be obtained)" flashing blue quickly, go back through the "Connecting the printer to the internet via WiFi" pairing step because you imputed the SSID or Security Key incorrectly
Star Micronics Document:https://starmicronics.com/help-center/knowledge-base/how-to-manually-setup-a-tsp100iiiw-and-assign-an-ip-address/
Star Micronics printer light indicator:
http://www.star-m.jp/products/s_print/tsp100iiiw/manual/en/troubleshooting/ledIndicators.htm
Compatibility requirements for TSP100III WLAN:
The printer cannot connect to a 5GHz network. Ensure that the network you are attempting to connect to is solely a 2.4GHz network or a combined 2.4Ghz/5Ghz network.
Additionally, the Security Type is determined by your network. The printer can only connect to WPA2/AES.
Wireless Mesh systems or Wi-Fi extenders are not supported, and the printer should connect to the main access point.
Do you have a Cash Drawer?
Yes - If you have a cash drawer make sure it is plugged into the printer and set up in the Admin à Point of Sale à Printers & Cash Drawers.

No - Make sure you don't have a Cash Drawer set up in Admin à Point of Sale à Printers & Cash Drawers. This could cause crashes in the app.
Do I have to reset and Repair my Printer every time this happens?
Wifi went down or poweroutage
No, When a printer disconnects from the Wi-Fi, it will automatically reconnect, but it will give you a new IP address. You need to Input this IP address into OrderPort administration and reload the catalog on the OrderPort App.
 You can also add a new printer on the POS from the tools and About screen.
How do Retrieve the new IP address?
You retrieve the IP address by turning the printer off. Then hold the feed button while turning the printer back on. The new Ip address should be very similar to the Old IP address.
Is there any way that you can not keep resetting the Printer if this happens often?
Static IP address
You can set the Printer IP address to Static. This Will prevent the Printer from updating its IP address when the Wifi goes down. However, setting the Printer to static is a little more complex. The instructions for static are on the printer guide.
https://orderport.freshdesk.com/en/support/solutions/articles/72000628848-receipt-printer-set-up
Please keep in mind when you are creating a static IP address, the First 3 sections of numbers must be the same as the router IP address. Any Ip adress that ends in .1 is the router IP address.
Ex: 192.168.1.2
Router IP: 192.168.1.1
How do you print a receipt on the Point of Sale?
Go to the Reports section in Tools > Reports. Do an order search and then click on the order. On the top of the screen, you will see a Print button that you can use if you want to reprint the customer's receipt.
How does Kitchen/Bar Printing work?
The kitchen ticket button will print any item in the cart that is linked to a printer in the Point of Sale. Items can be added, and the kitchen ticket printed at any time prior to checkout.
1. On the shop page add food items
2. Touch the Kitchen button to print the kitchen ticket
3. Add more items if needed and touch kitchen to print the kitchen ticket. The new kitchen ticket will only print the newly added items
4. You can always reprint all items in the cart by selecting 'Print entire ticket'
5. The printer type can be Thermal or Dot Matrix be sure to select the correct type of printer otherwise the ticket will not print.
A kitchen printer will only print products with the point of sale printer mode set to "Kitchen". Additionally, the product group or the individual product must be linked to the printer in the POS Settings module.
What is the difference between a thermal printer and Dot Matrix.
A thermal printer produces the peel-and-stick shipping label and the laser jet/inkjet option prints a label on a full sheet of paper that is generally folded and put into a clear shipping envelope. It is important to select the correct printer type because the label format is different for each type of printer and the label format for the thermal printer will not print on plain paper and vice versa. OrderPort saves the format you have selected at the time the label is printed.
Do you have Local Network turned on in Settings?
Without Local Network tuned on you can't print. After you turn this on you may need to close the app and re-open it.

Receipt Printer Printing Gibberish
Why is my receipt and/or kitchen printer printing out receipts that look like this?
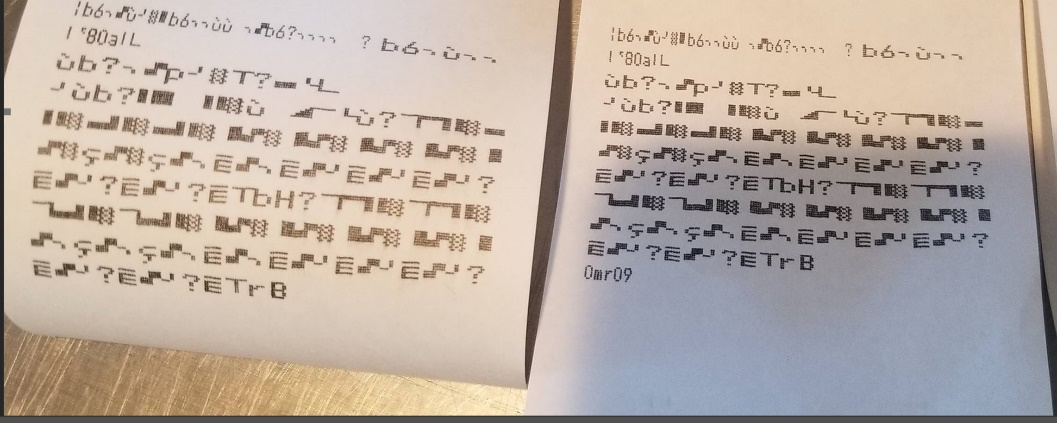
This is because you may have the wrong printer type selected in your point-of-sale settings, to edit your printer type go to the point of sale module, and hit the details button for the printer in question.
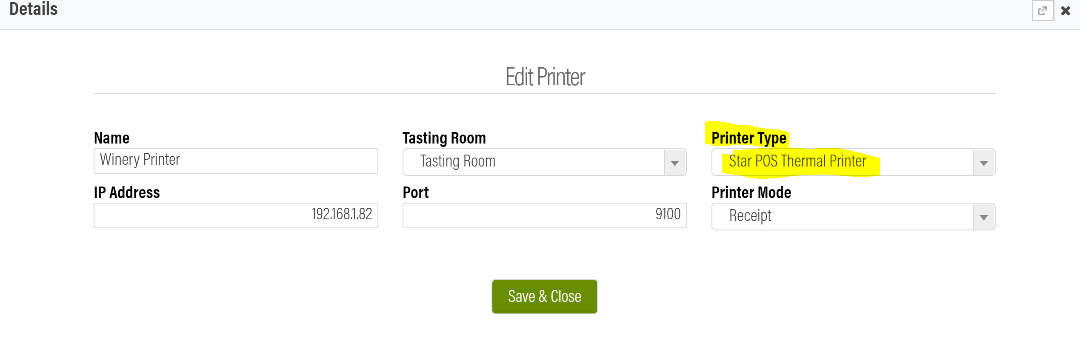
Make sure the printer type here is correct and if it is not change it to the correct type and save and close.